Unix Timeshare: Setting Up X2Go
Setting up X2Go
X2Go allows you to access a remote graphical desktop over a low bandwidth connection. In otherwords, you can use X2Go to login to the Unix timeshare in a graphical fashion instead of using a command line. It is similar to the X11 (or XWindows) system that use XDMCP (or SSH) to view a remote desktop. X2Go is availble on multiple platforms, so simply pick the client that works best for you. More information can be found on the X2Go website, located here.
X2Go on a Mac
In order to use X2Go with a Mac, you need to download an install an X11 environment. If you are running 10.6 or newer (Snow Leopard), then I suggest installing XQuartz. If you're using something older than 10.5, then you can use the OS install media that came with your computer to install X11. After you've installed X11, log out of your computer and log back in again. Notes about installation can be found here.
- Make sure you have X11 installed.
- Download the X2Go disk image from the X2Go website. You can find a link to the DMG, here.
- Double-click on the DMG to open it, then drag the X2Go application into your Applications folder.
If you are running OS X 10.7.5 (Lion) or later, you will need to disable Gatekeeper to run the application. The easiest way to do this is control-click on the X2Go application and choose "Open". You'll only need to do this once. More information about Gatekeeper can be found on Apple's website.
X2Go on Windows
The Windows version of X2Go includes an X11 server, so you just need to install the application. Notes about installation can be found here.
- Download the X2Go client from the X2Go website. You can find a link to the client installer, here.
X2Go on Linux
Your install will depend on the flavor of Linux you are running.
- For Ubuntu 12.04 or later, X2Go is included in the Ubuntu repo.
- Try: apt-get install x2goclient
- For RedHat/CentOS, you'll need to first add the EPEL repo.
- Then you can install X2Go with: yum install x2goclient
Instructions for installing X2Go on other popular Linux flavors is located here.
Using X2Go
The X2Go client works the same way across platforms, so once you have X2Go installed, you can just open it and connect. I recommend setting up a new session for easy access in the future. Here's how:
- Open X2Go. If this is your first time running it, you will get a New Session window automatically. If not, go to the Session menu and choose "New Session..."
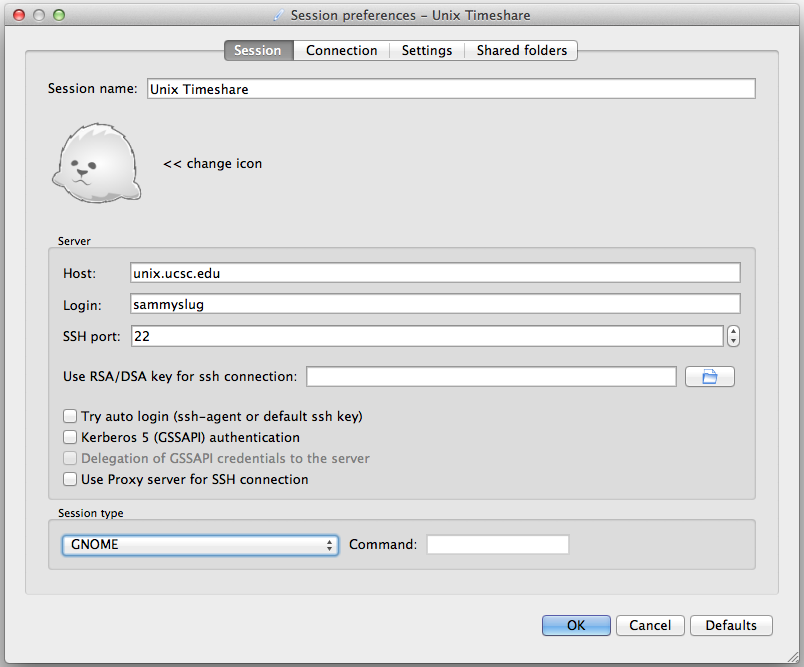
- In the New Session window, under the Sessions tab, fill out the following:
- Give your session a name, like "Unix Timeshare".
- For the Server Host, use:
unix.ucsc.edu - For the Server Login, use your CruzID (the first part of your email address).
- The SSH port should be 22
- At the botton, pick a Session type depending on your requirements:
-
Session Pros Cons XFCE Fast and lightweight. Good for off-campus connections. Might be a little too basic for some people MATE A good middleground between XFCE and GNOME. Pretty fast and a clean look. Fairly new, so it might not be compatable with everything. GNOME The default we use in the labs. Lots of features and looks familiar to most people. Heavy on bandwitdh and memory usage. Might feel sluggish over slower connections.
- At the top of the screen, change to the Connection tab.
- If you are using X2Go off campus, I recommend leaving this at ADSL.
- If you are on campus, you can change this to LAN.
- Now head over to the Input/Output tab.
- I recommend changing your resolution to at least 1024 x 768. You can resize the screen later.
- Turn off Set Display DPI
- Select Bidirectional copy and paste for the Clipboard mode.
- Media and Shared Folders can be setup later.
When your session looks good, click on the "OK" button to save it. On the main screen, you can see your saved Sessions on the right hand side. Click on the little downward arrow and select "Session preferences..." if you ever need to tweak anything.
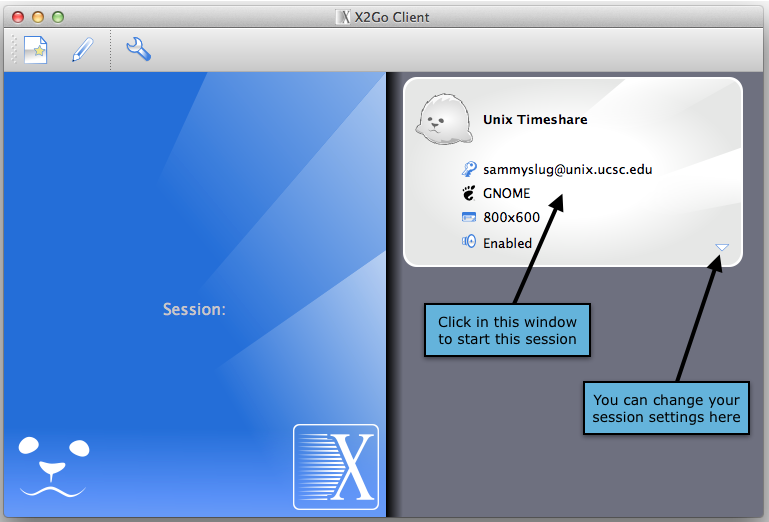
To connect to the Timeshare using your saved session:
- Click on the session you created on the right hand side. You should see a Login/Password prompt appear on the left hand side.
- Your Login name should be filled in with your CruzID. Just enter your CruzID password and click Okay.
- After a few seconds, you may get a "This server is unknown" message. If this is the first time connecting to the Timeshare using X2Go from this computer, then this is normal. The Timeshare is just indentifying itself as a new host. Click "Yes" to proceed.
- Your desktop should then appear after a few moments.
- When you're done, you can logout by going to the CentOS menu and selecting "Log Out..."
NOTE: While it is possible to suspend and reactive your X2Go session, please note that any sessions that have been idle for more than an hour may be disconnected without warning. The timeshare is shared by many different people doing lots of different things and X2Go sessions can be rather resource intensive. In order to keep things running smoothly for everyone, sessions that appear to be idle, unattended, or using too many resources for an extended time will be closed. Please save your work regularly!
Other X2Go information
X2Go offers remote printing and audio support. Any sounds being played on the Timeshare will be re-routed to your local computer speakers. Anything you print from the Timeshare will be routed to a local printer. You can also set up a shared folder on your local workstation that will appear on the Timeshare. This makes it easy to transfer files back and forth. You are on your own for setting up these extra features, but there is some documentation on the X2Go website.