Converting m4a to mp3 in iTunes
Return to Main Menu
Table of Contents
The purpose of this tutorial is to help you convert your m4a sound files to mp3. It is possible to use this tutorial to change sound files to several other extensions.
Starting the Process
- Launch iTunes. Go to the desktop, double click the
Applicationsfolder, and findiTunes. Similarly you can find the iTunes icon in the dock.

- Put in your CD containing the sound files you want to convert, or load up the sound files from your disk into iTunes. You can do this by going to
File > Add to Libraryand simply browse for the files you would like to open.
Changing Preferences
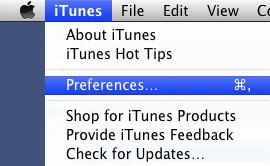
Before you start converting your sound files to mp3, we have to change some preferences in iTunes.- Go to the menu and click on
iTunes > Preferences.
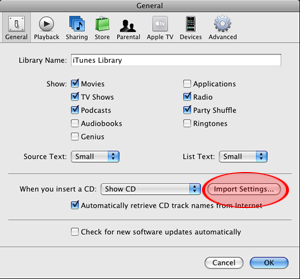
- The
Preferenceswindow will pop up in the "General" tab that looks like the following. Click on theImport Settingsbutton near the bottom circled in red.
- The
Import Settingswindow will pop up. Change the following drop-down menus:
a) Import Using: MP3 Encoder
b) Setting: Good Quality
Depending on what type of quality you want, you may want to choose something different than "Good Quality." For example, if you want high quality sound files, choose "High Quality." For more advanced users, you can choose to customize your settings and modify the stero bit rate, sample rate, and channels.
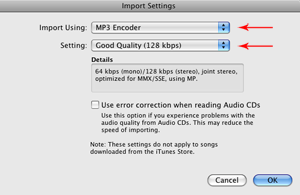
When you are done, clickOk.
Change Save Directory (optional)
If you want to change the directory of where your files will be saved, take the following steps. If not, this portion of the tutorial will show you were your files will be saved to.
- Go to
iTunes > Preferencesand change into theAdvancedtab at the top-right hand corner of the window (as shown in the red circle).
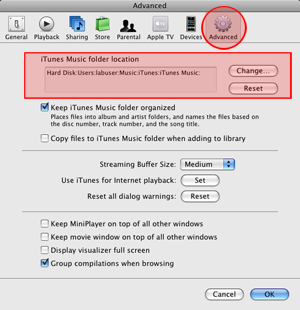
Your files are currently saved in the directory listed in the red box.
- To change where you want your files to be saved to, click on the
Changebutton to the right of the red box and browse for the folder you desire. When you are done browsing, save and clickOk
Return to Main Menu

UC Santa Cruz, 1156 High Street, Santa Cruz, Ca 95064
©2024 Regents of the University of California. All Rights Reserved.