Wired Residential Network
Students can connect to the network in select locations via a wired Ethernet connection. If you live in one of these areas, a personally-owned wireless router is required.
Wired Locations
- Merrill College Residence Halls C+D
- University Town Center (UTC)
All other locations not specified above are completely wireless. In wireless locations, Ethernet access is not available and personally-owned wireless routers are prohibited. For connecting in completely wireless residences, please visit our Get Connected pages.
Requirements for Connecting
To connect in a wired location, you will need:
- A wireless router
We recommend obtaining a router with at least Wi-Fi 5 (AC) support, preferably Wi-Fi 6 (AX) support. Mesh routers are not recommended in residence halls. Cable modem/router combos do not work. Each residence is limited to one router, so please coordinate with your roommates.
- An Ethernet cable
One is typically included in the box of a router.
- A compatible computer
For minimum and recommended requirements, please visit our Computer Recommendations pages.
Free Configuration Service
ResNet technicians can configure your personally-owned wireless router. Please drop your router (and power supply/antennas) off at our office. You will also need to provide a preferred network name and password. This service is free for residential students. You can find our location, hours, and contact information on the ResNet homepage.
Room Self Setup
-
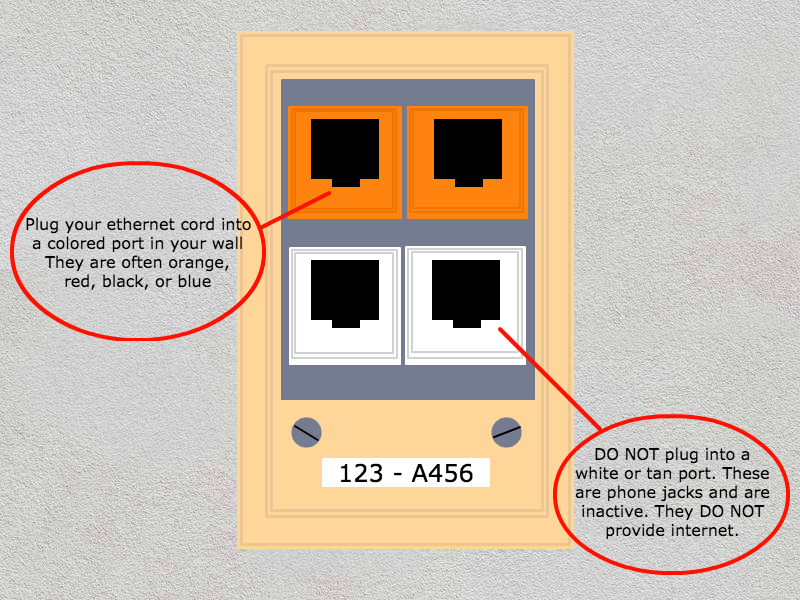
Locate your Ethernet jack
Each bedroom is equipped with one Ethernet jack. You may need to look behind your wardrobe, desk, or bed to locate it. The faceplate may have multiple ports, but only one will be active. Do not attempt to plug an Ethernet cable into the smaller phone jack as it will get stuck.
-
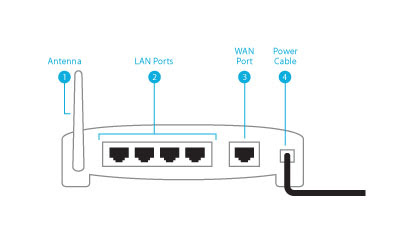
Connect your router
Plug one end of the Ethernet cable into the jack and the other end into the WAN port of your router. This will often have a globe icon or be outlined in yellow. It will typically be separated from the other four Ethernet ports on your router.
-
Set up your router
If you did not have ResNet configure your router, you will need to follow the router's instruction manual. Do not alter your router's default DHCP, NAT, or DNS settings.
-
Connect your devices
Connect your computers, smartphones, tablets, and other devices to the router's wireless network. If ResNet configured your router, your network name and password is located on a sticker on the front.
- ResNet Home
- FSH Family
- Computer Recommendations
- Xfinity On Campus
- Connect to ResWiFi
- Copyright
- Job Opportunities
- ResNet Infrastructure
- Frequently Asked Questions
Need Help?

Call: (831) 459-HELP (9-4357)
Email: help@ucsc.edu
