Grouper add/remove
How to add and remove people in Grouper
These instructions are for Group Membership Managers who are looking to add and remove people in groups in the Grouper application.
Add a person to a group
- Navigate to or search for your group in Grouper and bring it up in the main window.
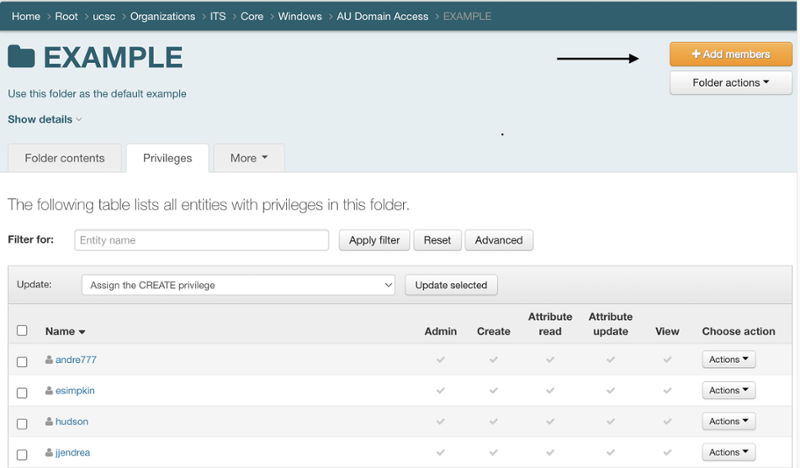
- On the Privileges tab, click the +Add members button.
- In the Member name or ID: box enter the first and last name of the person you want to add to the group. You will see spinning ellipses as Grouper searches, and then a list of one or more matches.
- Do not press the “enter” button on your keyboard after typing the name. If you do then Grouper will give a “No matches found” error message. If this happens, simply backspace over the last character in the name and type it again to restart the search.
- The match list shows the person’s preferred name, official email address, NetID, HUID, and other unique identifiers. Use this information to select the correct person from the list.
- People who have left Harvard will normally not display an email address.
- Keep the Default privileges selected.
- Click the Add button to add the person as a member of your group. Repeat this process to add additional people as members of the group.
- A person’s HUID, NetID, email or just a portion of their name can also be entered in the Member name or ID: box to start a search.
- View people added to the group in the Members tab.
- People added to your group in this way will show as having a Direct Membership in your group.
- Click the +Add members button again to close the Add members section.
If you need assistance, contact the ITS Support Center.
- JMP Software for Students
- Grouper
- Software for Faculty/Staff
- Student Software Services
- Adobe Creative Cloud
- ArcGIS on a Mac
- JMP for Students
- MATLAB
- Microsoft Campus
- Microsoft 365 Apps for Enterprise
- Dell - Software Reseller
- SPSS for Faculty & Staff
- SPSS for Students
- UCOP Purchase Agreements
- Campus Lab Software
- Standard Software
- Software Release
- SSL Request Form
- feedback
- Qualtrics CoreXM Survey
- Adobe Creative Cloud
Need Help?

Call: (831) 459-HELP (9-4357)
Email: help@ucsc.edu

UC Santa Cruz, 1156 High Street, Santa Cruz, Ca 95064
©2025 Regents of the University of California. All Rights Reserved.